


今回はcreate-react-appを使わず、webpackの設定を直接行いゼロからプロジェクトを作成していこうと思います。
はじめに
Reactの開発環境を作成するFacebook製の「create-react-app」の開発が、2023年にて止まってしまいました。
これは、今後Create React Appではなく、別の手法でプロジェクトを作成すると解釈しています。
公式もプロジェクトの作成は、最新のReactフレームワークである「Next.js」「Remix」「Gatsby」「Expo」等の使用を薦めている状態です。
また、ビルドツールは「webpack」から「vite」に人気が移りつつあるようです。
上記の何れかを選択するとしても、まずはwebpackの役割等を知ることは重要な事だと思います。
本記事はcreate-react-appを使わず、webpackを設定しつつアプリを制作していこうかと考えています。
アプリ制作後は、同じ資材を用いて他のフレームワークを試してみたいと思います。
作業手順
先ずは、今回プロジェクトを作成する環境を記載します。
npmの初期化
プロジェクトを作成したいフォルダに進み、下記コマンドを実行します。
npm init -yコマンドの実行が完了すると「package.json」が作成され、内容がコマンドプロンプトに投影されます。
webpackのインストール
今回の本命、webpackのインストールです。下記コマンドを実行します。
npm install --save-dev webpack webpack-cli webpack-dev-server html-webpack-plugin| 名称 | ver | 説明 |
|---|---|---|
| webpack | 5.95.0 | webpackの本体 |
| webpack-cli | 5.1.4 | webpackのコマンドラインインターフェイス。必須 |
| webpack-dev-server | 5.1.0 | 開発環境向けのwebサーバー。無いと開発が手間 |
| html-webpack-plugin | 5.6.0 | HTMLファイルを「dist」直下に生成するプラグイン |
コマンドが完了すると、「node_modules」フォルダと「package-lock.json」が作成されます。
Reactのインストール
下記コマンドを実行します。
npm install react react-domTypeScriptのインストール
下記コマンドを実行します。
npm install --save-dev typescript ts-loader @types/react @types/react-domtsconfig.json作成
TypeScriptの設定ファイルを作成します。下記コマンドを実行してください。
npx tsc --initコマンド実行後、「tsconfig.json」が作成されます。
今回は、下記設定を反映しました。設定に正解はないので、開発環境等々とご相談下さい。
{
  "compilerOptions": {
    "target": "ES2020",                       /* Set the JavaScript language version for emitted JavaScript and include compatible library declarations. */
    "module": "ESNext",                       /* Specify what module code is generated. */
    "lib": [
      "ES2020",
      "DOM"
    ],                                        /* Specify a set of bundled library declaration files that describe the target runtime environment. */
    "jsx": "react",                           /* Specify what JSX code is generated. */
    "moduleResolution": "node",               /* Specify how TypeScript looks up a file from a given module specifier. */
    "baseUrl": "src",                         /* Specify the base directory to resolve non-relative module names. */
    "allowJs": true,                          /* Allow JavaScript files to be a part of your program. Use the 'checkJS' option to get errors from these files. */
    "sourceMap": true,                        /* Create source map files for emitted JavaScript files. */
    "outDir": "./dist",                       /* Specify an output folder for all emitted files. */
    "esModuleInterop": true,                  /* Emit additional JavaScript to ease support for importing CommonJS modules. This enables 'allowSyntheticDefaultImports' for type compatibility. */
    "forceConsistentCasingInFileNames": true, /* Ensure that casing is correct in imports. */
    "strict": true,                           /* Enable all strict type-checking options. */
    "skipLibCheck": true,                     /* Skip type checking all .d.ts files. */
  },
  "include": ["src/**/*"],
}
CSS関連のインストール
CSS関連の便利なツールをインストールしていきます。
npm install --save-dev sass css-loader sass-loader mini-css-extract-plugin各種プラグインをインストール
下記コマンドを実行します。
下記プラグインは必須ではないので、必要と判断した項目のみインストールして下さい。
npm install --save-dev clean-webpack-plugin copy-webpack-plugin dotenv-webpack file-loader| 名称 | ver | 説明 |
|---|---|---|
| clean-webpack-plugin | 4.0.0 | ビルド時に出力先のフォルダ内のファイルを削除する webpack自体に機能があるため、不要かも… |
| copy-webpack-plugin | 12.0.2 | ビルド時に特定ファイルをコピーする |
| dotenv-webpack | 8.1.0 | ビルド時に環境変数を読み込む |
| file-loader | 6.2.0 | 画像を読み込む |
各フォルダ・ファイルを作成する
下記コマンドを実行し、フォルダとファイルを作成します。
mkdir dist
mkdir public
mkdir src
type nul > ./src/index.tsx
type nul > ./public/index.html
type nul > webpack.config.js
type nul > .env
cd src
mkdir images
mkdir css
「create-react-app」では、フォルダ「build」にファイルが出力されていましたが、今回は「dist」フォルダに出力します。※任意設定です
他は基本的に変わらないと思います。
フォルダ「src」直下に、画像ファイル配置用のフォルダ「images」、cssファイル配置用のフォルダ「css」を作成しています。
※「images」ファイルには、何か適当な画像ファイルを放り込んで下さい。
index.html
フォルダ「public」に配置しています。適宜修正を行います。
<!DOCTYPE html>
<html lang='ja'>
    <head>
        <meta charset='UTF-8'>
    <meta
        name="description"
        content="create-react-appを使わずサンプルアプリを組んでいます"
    />
    <title>Sampleアプリを作ろう</title>
    </head>
    <body>
        <noscript>You need to enable JavaScript to run this app.</noscript>
        <div id='root'></div>
    </body>
</html>
index.tsx
フォルダ「src」に配置しています。こちらも適宜修正します。
import React from 'react';
import ReactDOM from 'react-dom/client';

const root = ReactDOM.createRoot(
    document.getElementById('root') as HTMLElement
);
root.render(
    <React.StrictMode>
        <div>test</div>
    </React.StrictMode>
);
webpackの設定を行う
ここから本記事のメインである、「webpack.config.js」の設定を行います。
今回の設定は、あくまで一例です。
各設定は、環境毎・プロジェクト毎に変わってきます。適宜対応してください。
プラグインのインポートとベース作成
先ずは、色々とインストールしたプラグインの読み込みと、全体のベースを記述します。
変数「config」を設定し、色々と設定を盛り込んでいきます。
const path = require('path');
const HtmlWebpackPlugin = require('html-webpack-plugin');
const { CleanWebpackPlugin } = require('clean-webpack-plugin');
const MiniCssExtractPlugin = require('mini-css-extract-plugin');
const CopyWebpackPlugin = require('copy-webpack-plugin');
const Dotenv = require('dotenv-webpack');

const isProduction = process.env.NODE_ENV == 'production';

const config = {
};

module.exports = () => {
    if (isProduction) {
        config.mode = 'production';
    } else {
        config.mode = 'development';
    }
    return config;
}
entry
バンドルする際、起点となるファイルを指定します。
今回は「src/index.tsx」にする予定なので、下記設定を行いました。
entry: './src/index.tsx',output
バンドルした際のファイル配置先と、ファイルの命名等を設定します。
今回はフォルダ「dist」に出力する予定なので、その設定を入れています。
jsファイルは、「dist/static/js」配下に出力されます。
output:{
    // バンドルしたファイルの出力先を設定する
    clean: true,
    path: path.join(__dirname, './dist'),
    chunkFilename: 'static/js/[contenthash].chunk.js',
    filename: 'static/js/[contenthash].bundle.js',
    publicPath: '/',
},
module
各モジュールの振る舞いを指定します。
今回は、TypeScriptを使用するので「ts-loader」を指定し、CSSファイル、画像ファイルも各々の「loader」を指定します。
※CSSの「loader」は、設定の順番が決まっているので注意して下さい。
module: {
    rules: [
        {
           test: /\.(ts|tsx)$/i,
           exclude: ['/node_modules/'],
           use: {
               loader: 'ts-loader',
               options: {
                   configFile: path.resolve(__dirname, 'tsconfig.json'),
               }
           }
        },
        {
            test: /\.(scss|sass|css)$/i,
            use: [MiniCssExtractPlugin.loader, 'css-loader', 'sass-loader'],
        },
        {
            test: /\.(png|jpg|gif|svg)/,
            use: [
                {
                    loader: 'file-loader',
                    options: {
                        name: path.resolve(__dirname, 'src/images/[name].[ext]') //[name]は画像名、[ext]は拡張子
                    }
                }
            ]
        },
        {
            test: /\.(eot|ttf|woff|woff2)$/i,
            type: 'asset',
        },
        // Add your rules for custom modules here
        // Learn more about loaders from https://webpack.js.org/loaders/
    ],
},
devServer
開発サーバ「webpack-dev-server」の設定を行います。
「historyApiFallback:true」は、後々のreact-router-domで重要になってくるので、必ず設定しておいて下さい。
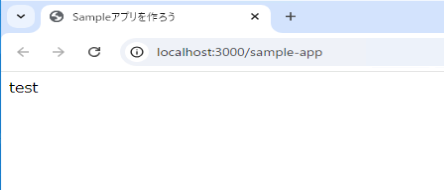
下記設定では規定ブラウザが起動し、「http://localhost:3000/sample-app」のURLで起動します。
devServer:{
    static: {
        directory: path.join(__dirname, 'public'),
    },
    server: 'http',
    host: 'localhost',
    port: '3000',
    open: ['/sample-app'], // true:サーバを起動したとき自動でブラウザを起動する
    liveReload: true, // true:ファイルの変更を検知して自動でブラウザをリロードする
    watchFiles: ['src/**/*'], // ファイルの変更を検知して自動でブラウザをリロードする
    historyApiFallback: true, // true:ブラウザのリロードを行わない
    compress: true, // true:gzip圧縮を有効にする
    client:{
        logging: 'info',
        progress: true,
        overlay: true
    }
},
resolve
ファイルのインポート時に、拡張子を省略する事ができます。
resolve:{
    extensions: ['.ts', '.tsx', '.js', '.jsx'],
},
target
コンパイルターゲットを指定します。今回は「web」のみで。
target: 'web',plugins
導入するプラグインを組み込みます。
CSSファイルの命名、出力先、画像ファイルのコピー先等を指定します。
plugins: [
    new HtmlWebpackPlugin({
        template: path.join(__dirname, 'public', 'index.html'),
    }),
    new CleanWebpackPlugin(),
    new MiniCssExtractPlugin({
        chunkFilename: 'static/css/[contenthash].css',
        filename: 'static/css/[contenthash].css',
    }),
    new CopyWebpackPlugin({
        patterns: [
            { from: 'src/images', to: 'static/img' },
        ]
    }),
    new Dotenv(),
     // Add your plugins here
    // Learn more about plugins from https://webpack.js.org/configuration/plugins/
],
全体
設定項目はまだまだ存在していますが、今回のアプリ制作で必要な箇所のみ行っています。
const path = require('path');
const HtmlWebpackPlugin = require('html-webpack-plugin');
const { CleanWebpackPlugin } = require('clean-webpack-plugin');
const MiniCssExtractPlugin = require('mini-css-extract-plugin');
const CopyWebpackPlugin = require('copy-webpack-plugin');
const Dotenv = require('dotenv-webpack');

const isProduction = process.env.NODE_ENV == 'production';

const config = {
    entry: './src/index.tsx',
    output:{
        clean: true,
        path: path.join(__dirname, './dist'),
        chunkFilename: 'static/js/[contenthash].chunk.js',
        filename: 'static/js/[contenthash].bundle.js',
        publicPath: '/',
    },
    module: {
        rules: [
            {
                test: /\.(ts|tsx)$/i,
                exclude: ['/node_modules/'],
                use: {
                    loader: 'ts-loader',
                    options: {
                        configFile: path.resolve(__dirname, 'tsconfig.json'),
                    }
                }
            },
            {
                test: /\.(scss|sass|css)$/i,
                use: [MiniCssExtractPlugin.loader,'css-loader', 'sass-loader'],
            },
            {
                test: /\.(png|jpg|gif|svg)/,
                use: [
                    {
                        loader: 'file-loader',
                        options: {
                            name: path.resolve(__dirname, 'src/images/[name].[ext]') //[name]は画像名、[ext]は拡張子
                        }
                    }
                ]
            },
            {
                test: /\.(eot|ttf|woff|woff2)$/i,
                type: 'asset',
            },
             // Add your rules for custom modules here
            // Learn more about loaders from https://webpack.js.org/loaders/
        ],
    },
    devServer:{
        static: {
            directory: path.join(__dirname, 'public'),
        },
        server: 'http',
        host: 'localhost',
        port: '3000',
        open: ['/sample-app'], // true:サーバを起動したとき自動でブラウザを起動する
        liveReload: true, // true:ファイルの変更を検知して自動でブラウザをリロードする
        watchFiles: ['src/**/*'], // ファイルの変更を検知して自動でブラウザをリロードする
        historyApiFallback: true, // true:ブラウザのリロードを行わない
        compress: true, // true:gzip圧縮を有効にする
        client:{
            logging: 'info',
            progress: true,
            overlay: true
        }
    },
    resolve:{
        extensions: ['.ts', '.tsx', '.js', '.jsx'],
    },
    target: 'web', // ブラウザ側にコンパイルする
    plugins: [
        new HtmlWebpackPlugin({
            template: path.join(__dirname, 'public', 'index.html'),
        }),
        new CleanWebpackPlugin(),
        new MiniCssExtractPlugin({
            chunkFilename: 'static/css/[contenthash].css',
            filename: 'static/css/[contenthash].css',
        }),
        new CopyWebpackPlugin({
            patterns: [
                { from: 'src/images', to: 'static/img' },
            ]
        }),
        new Dotenv(),
         // Add your plugins here
        // Learn more about plugins from https://webpack.js.org/configuration/plugins/
    ],
};

module.exports = () => {
    if (isProduction) {
        config.mode = 'production';
    } else {
        config.mode = 'development';
    }
    return config;
};
package.jsonの修正・追記
「package.json」の修正を行います。
「name」「description」「main」「scripts」に修正を行います。
{
  "name": "sample-app",
  "version": "1.0.0",
  "description": "create-react-appを使わずにReactを使ってみる",
  "main": "./src/index.tsx",
  "scripts": {
    "start": "webpack-dev-server .",
    "build": "webpack --mode production",
    "test": "echo \"Error: no test specified\" && exit 1"
  },
  "keywords": [],
  "author": "",
  "license": "ISC",
  "devDependencies": {
    "@types/react": "^18.3.9",
    "@types/react-dom": "^18.3.0",
    "clean-webpack-plugin": "^4.0.0",
    "copy-webpack-plugin": "^12.0.2",
    "css-loader": "^7.1.2",
    "dotenv-webpack": "^8.1.0",
    "file-loader": "^6.2.0",
    "html-webpack-plugin": "^5.6.0",
    "mini-css-extract-plugin": "^2.9.1",
    "sass": "^1.79.3",
    "sass-loader": "^16.0.2",
    "ts-loader": "^9.5.1",
    "typescript": "^5.6.2",
    "webpack": "^5.95.0",
    "webpack-cli": "^5.1.4",
    "webpack-dev-server": "^5.1.0"
  },
  "dependencies": {
    "react": "^18.3.1",
    "react-dom": "^18.3.1"
  }
}
テスト起動
プロジェクトの下地が完成したので、一旦ブラウザから画面を確認してみたいと思います。
コマンドプロンプトで下記コマンドを実行してください。
npm run startさて画面を確認してみましょう。
おわりに
以上になります。
いかがだったでしょうか。
「create-react-app」を使わずにプロジェクトが作成できたと思います。
これからはこのプロジェクトを使用して、目標のサンプルアプリを作成していこうかと思います。
これからも引き続きよろしくお願いいたします!